Monday, December 2, 2013
A Simple Web Application With ASP.NET MVC - part 1
In my last post, I explained how easy it is to start web development using ASP.Net MVC with the help of different kinds of tools. So as promised I’m going to show you how to use those tools to develop a simple web application. I’m going to develop a simple student management System with a little database and few pages to edit, delete and update student details. I’m using Visual Studio 2012 and C# and I have both MVC 3 and 4 installed.


I didn't use any of the tools I mentioned in the last post yet. We have yet to add Entity Framework, write model classes and generate the database. For this post my main purpose was to show you how ASP.NET MVC makes it easy to create, organize and manage your code. You don’t have to wonder around thinking what goes where. If you know something is missing, you’ll know exactly where to look when you are working with ASP.NET MVC.
Thursday, November 28, 2013
Why ASP.NET MVC is a better choice to develop your first dynamic web application
ASP.NET MVC has become very popular in web developments and yet some people are still refusing to move on to it. That happens when you get used to some technology. It's really hard to leave it and move on. I'm not writing this post to promote ASP.NET or something. I'm just telling you why I think it's a good choice, specially for a beginner. Because as a beginner, my experience was not a very good one with PHP. It took a long time to learn how to apply the MVC correctly to my web sites. Some of my views had unnecessary PHP code and controllers had some business logic inside them. Everything was very confusing. So I'm going to explain you how ASP.NET MVC gives you a different experience.
First of all, if you have created web applications,
complicated ones, without using a design pattern like MVC, you must know how
hard it is to manage your code. MVC pattern provides a clean separation for
your data access, views and business models. So if you want to change the
design of your database, you only need to modify your data access classes. If
you want to add some business logic to your application you can add them to
your model classes. If you want to change the appearance of your web pages you only
need to edit your view classes.
All this is because MVC separates HTML from your code. There
are few choices to develop your web application using MVC. If you are a Java
developer you can use one of the frameworks available such as Spring or Play. If you are using PHP you can use
frameworks such as CodeIgnoter or CakePHP. And of course there are many other ways which I
may even haven’t heard of. I’ve tried both above options before move on to
ASP.NET web development and I found it a little bit hard to adopt as a
beginner. Because most of the things had to be done manually even with the use
of frameworks. It was a lot of work.
But once you start with ASP.NET MVC you will realize that a
lot of things are done by the framework. So as a beginner you won’t have to
worry about what goes where or where to put things. All you have to concern about
is the functionality you want to add to each action.
Let me give you a brief explanation on the role of ASP.NET
framework in running an MVC web application. As I said,
all your html files are placed in a separate views folder with ‘.cshtml’ extension.
And page files are stored separately as ‘.aspx’ files. When a request comes to
a particular page, ASP.NET framework combines both types to generate an HTML
file and sends it as a respond.
So why use this? I already told you that there are lots of auto
generations. Other than that, it is very easy to combine database to your
project with the help of a great framework called Entity Framework. This framework
provides you a nice DbContext
instance, which does all the communication with the data base. So no more long SQL :) . This is called model first approach with EF.
There is even cooler version called code first. In that, you write your model
classes first, and then you build your code, EF creates the DB for you!!!
After combining the database, you have to write controllers
and views, right? With Visual Studio you can right click on your controller method
and select ‘add view’ then the view will be created in the correct place. You don’t
have to manually go and create folders. When you create the views there are
lots of auto generation options which I will talk about in another blog post.
Finally in your views, there is a really nice parser engine,
Razor
which enables method like html code generation and it is really easy to use. So
as you can see, there are lots of help to make your web development easier. Once
you start with all these help and build few apps on your own you eventually can
understand how all these things work.
I’m going to illustrate how to develop a simple web
application using all above ‘help’ in my next few posts. Until then, Happy
coding!!!
Sunday, November 24, 2013
C# with Visual Studio: An easy way to improve your code quality.
We, all programmers normally have a programming language of preference
and a favorite IDE. In my case it’s c# and Visual Studio. We think sometimes if
we can read and understand our own code it’s more than enough. When you were
doing single pet projects of course that was enough. Nobody is there to point
out bugs and you test your own code (only if you care to test). But when you
start doing very large group projects, your code’s quality plays a major role. Your
code must be well organized; all the classes, variables and methods must be properly
named and well commented. Because other developers in your team need to understand what you have done with the code. And your QA team members who do the testing need proper documentation to understand the functionality of your code.
Programmers normally are very lazy when it comes to
commenting. Even I was. And some of us have no idea how to do correct
commenting. Today I’m going to share an easy way to maintain the quality of
your code using few simple tools.
The tools I was talking about are extensions for Visual
Studio 2008+. One is StyleCop and
other is GhostDoc.
You can download them from above links and install them. I will illustrate how
to use them to improve the quality of your code.
So your unformatted and uncommented code will look something like
this.

StyleCop is a cool extension which can be used to analyze
your code. This is how you analyze your code with StyleCop.
- Right click on the class on your solution explorer. And select run StyleCop.

- It will generate a list of warnings and may be errors as follows. If you double click on them you will be taken to the line where the warning appears.
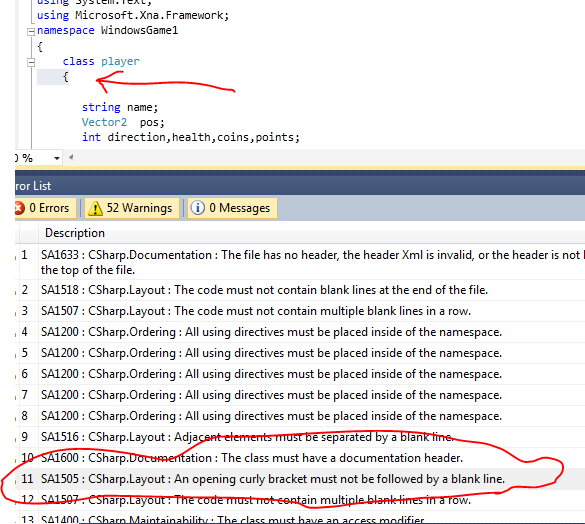

You can correct the spacing errors one by one. But what
about the ‘documentation header missing’ warnings? You have to write them for each
and every one of your classes, methods and variables, right? Not anymore. That’s
where our other extension GhostDoc comes in to play. It will do that hard work
for you. This is how it is done.
- When you double click on a document header missing warning styleCop highlights that property for you. What you have to do is right click on highlighted text and select ‘document this’ option GhostDoc provides you.

- This is how my newly generated comment looks like. Easy huh.. You can include any additional information you want to add in the header.

So I hope all the steps were clear. If you want any
additional info please leave a comment. In the mean time Happy Coding!!!
First Day as an intern
As I mentioned in my
previous blog post, my carrier path just started last week as a trainee
software engineer. I think it was an important week because I had to do a lot
of adjustments to fit into my working environment. In this blog post I'm gonna
share how I did that.
So let me start with
my first day as a trainee software engineer. I
woke up on that day with a little excitement and a feeling of uncertainty and
of course nervous. I suddenly wasn't sure about anything on that morning. I
planned everything on previous night. What to wear, how to put my hair, how I
go there, what to bring and even practiced how to smile. :) But in the morning
I was like, OH my god! I will look like an alien if I go dressed up like this,
what if there is too much traffic and I get late? Do I have everything I need
or did I miss something?. So many worries..
You may have already
experienced your first day at work, but there can be few others who are looking
forward to get that experience. This can be a help to them. This is how I
survived the first day of my internship. I'll start with my dress. Actually I
have been to my work place few
times before for the interviews and I saw how people there dress. So I had a
basic idea on how to dress. If you don't know anything about your future
working environment, I suggest you select formal dressing. It may be too much.
But over dressing is always better than under dressing. In my case my choice
was fine.
If you don't know how
to get there you must go really early because finding the way to your work
station may not be as easy as you thought. Believe me you really don't wanna be
late on your first day. In my case I went there half an hour earlier. And that
extra time actually helped me settle down.
On your first day you
may not know what to bring. May be you can ask someone if there are additional
things you must bring. For example some of my batch mates were asked to
bring police reports and some were asked to bring laptops. If not
specifically mentioned something like that, you have to bring your NID,
passports if any, a pen and a note book and something to eat if your employer
doesn't provide you meals. You must know what NID and passports are needed for.
Pen and notebook is to note down any important thing, may be some action you
have to perform or some technical detail. You don't wanna forget important
things with the excitement of the first day and make a bad impression. Right?
Remember to smile with
anyone who comes on your way and be polite. You may be nervous or shy but do it
anyway because it is important that everyone knows you are a friendly person.
So later if you need any help you can go to them and ask for it. To adjust to
the environment, your people skills are really important. All and all you are
gonna spend some time there, right?
In my case all the
interns from different institutes were gathered together and few presentations
were carried out to give us an idea about the company background, the culture,
expectations and the internship plan. In such situations pay attention to
details, those really are important. You are not a student anymore. You have
responsibilities to your company and your company has expectations from you.
And you have to understand them. Remember to note down anything important.
In the afternoon we
had a workshop and since it is a technical session I thought of writing a
separate blog post on that. So I hope there were few things that might be
helpful for some of you. Feel free to leave a comment. See you with my next
post. :)
Here begins my Tech Ride
I wanted to start writing a blog for a long time but couldn't find time for it. But then I learned time is always there if I properly prioritize my work. When I finally found time, I had no idea what to write in a blog. What if I write something wrong? What if my posts are not interesting for anyone to read? What if the things I write are just stupid things? Well, who cares? People make mistakes. Other people will correct me if I post something wrong while some others will even criticize. We can always learn from our mistakes.
If there are others like me who want to start blogging and doesn't know where to or how to start, I invite you to start with something you know. It doesn't have to be 100% correct or very interesting. But you have to start somewhere. right? And I'd like to kindly ask all those experienced bloggers out there to correct me if I'm wrong and suggest any kind of improvement. So here goes my first blog post.
I started my industrial training on last Monday and had a really interesting bunch of experiences. In my blog what I'm gonna do is share them with you all. Even though I named this My Tech Ride, there will be few non technical stuff too. That is because I started this blog not only to share my experience with you but also to remember my own learnings on different areas. Apart from that, I think there are things that are important when you move from being a student to being a professional. This is a very important period of time of any students life because it is kind of a transition time. There are a lot of qualities that you must develop inside you if you want to really become successful in your carrier. Last week was just the beginning of my transformation, as I see it. So stay with me and I will share all my experiences with you.
Subscribe to:
Posts (Atom)