In my last post, I explained how easy
it is to start web development using ASP.Net MVC with the help of different
kinds of tools. So as promised I’m going to show you how to use those tools to
develop a simple web application. I’m going to develop a simple student
management System with a little database and few pages to edit, delete and
update student details. I’m using Visual Studio 2012 and C# and I have both MVC
3 and 4 installed.
As always the first step is to create a new
project. You can do that by selecting new project under files menu.

In the left
side menu, expand Installed, Templates, then Visual C# there is a ‘Web’ option
listed. That is what you need to select to create a web application. When you
select 'Web' VS will list a set of different templates available. You can choose
any MVC version. I’m creating an MVC 3 web application, so I’m going to choose
ASP.NET MVC 3 Web Application. Give a name and a location and click ok.

Then
you will be asked to select a project template. The Internet application
template provides a homepage and links to register login and log off. The empty
template is better if you want to build your user interface from scratch. Since
we need to understand how things work, I’m going to use that. Keep the default
value for the view engine (Razor) and click ok. It will create an empty new
project.

You can run the app but it will simply show a 404 error
massage. If you look at the solution explorer, you can see the structure of
your project. There is an APP_Start folder which contains some routing and
bundling data, and a Content folder which contains CSS and themes, a Scripts
folder to contain all the scripts and few others too. Among them the folders we
need to work on are Models, Views and Controllers. Before that, I want you to
take a look at Web.config file and Globle.asax file. Web.config file has all
the configuration data, for example if we are going to connect a database to
our project the connectionStrings should go in to this file and if we want to
enable client side validation, this is the file we have to configure.
Globle.asax is the bootstrap of our application. Everything starts with the Application_Start() method in it. Just notice it
calls a method to register the routes. That’s how the server that our application
runs on know how to navigate through our app. Default values in that method
looks like this.
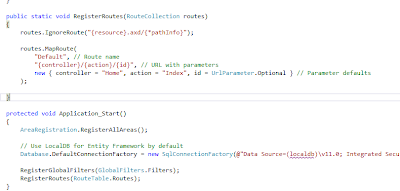
By
default the controller is Home and the action is Index. Our app currently gives
a 404 error massage because we still don’t have those default value in our app.
So let’s go ahead and add them. Right Click on controllers folder and select
Add => Controller.

It will present a dialog box to add some values. In the
controller name notice how ‘Controller’ part has automatically appended to the
name. This is a must in ASP.NET MVC. Every controller must end with ‘Controller’.
Let’s name it HomeContriller. Under
scaffolding options we have several templates to select from. An ‘empty
controller’ will create a controller with only Index action. ‘Controller with
read/write actions and views, using Entity Framework’ will create almost
complete controller with all CRUD actions to your database (Like I said.. Lots
of auto generation :-) ). Since we don’t
have a database yet, just select a Controller with empty read/write actions and
click add.

That option generated a bit of code (just empty methods) and we have
to add method bodies later. For now let’s just run our application. Notice now we
don’t get a 404, but get a different error like this.

That
is because now we have created default controller and the action (i.e. Home and
Index) server can navigate to ../Home/Index. What we don’t have is a view. The
server looks at the places that are listed in the error massage for a matching
view. It can’t find it because we haven’t created a view called Index anywhere.
Creating a view in ASP.NET MVC is very easy. Right click in the controller
method and select Add View.

These dialog boxes are very intelligent, they know since I’m
in the Index method, I want a view called Index. View engine is Razor and I
will explain what that is later. Again create strongly typed view is an option
which generates a lot of code automatically. But for this time we will leave it
blank and do things manually. Keep everything else as they are and click add.

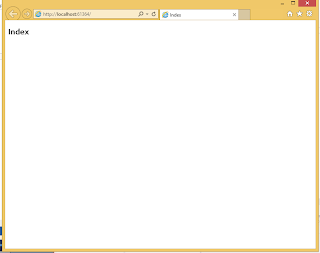
Notice how it created a new folder called Home (i.e. name of
our controller) inside Views folder and added Index.cshtml file inside it. Save
everything and run the app again. Now you can see there are no errors. You have
a huge blank page with a large ‘Index’ header in it.
So congratulations! That’s your first web application. :-)
I didn't use any of the tools I mentioned in the last post
yet. We have yet to add Entity Framework, write model classes and generate the
database. For this post my main purpose was to show you how ASP.NET MVC makes
it easy to create, organize and manage your code. You don’t have to wonder
around thinking what goes where. If you know something is missing, you’ll know
exactly where to look when you are working with ASP.NET MVC.
So I hope everything is clear. I will add some functionality
to the web application in my next post.


